Do not change the resources folder. Not every VST plug-in uses a resources folder.
When you use the Sylenth1 for the first time it will ask for the personal license code you should have received by e-mail. Enter the code and make sure your computer is connected to the internet. After entering the code the Sylenth1 is licensed and ready to use.

Sometimes online mastering customers ask us what they can do to make their productions sound better. Obviously mastering will have a big impact on the final sound. But more important is the choice of the right sounds. In the old days you would need a real synthesizer to create sounds. But nowadays most of the sounds in a production come from so called soft synths. Soft synths are one of the most powerful tools you can use to create an unique and powerful sound. Most soft synths are so called VST plugins. Almost all programs intended for music production like Ableton, Cubase and FL-Studio support the VST format. VST is an abbreviation for Virtual Studio Technology.
This article is written for both the novice and the more experienced producers. So we will explain some basic concepts of synthesizers as well.
The Sylenth1
A widely used and well sounding soft synth is the Sylenth1 from manufacturer Lennar Digital. The Sylenth1 is ideal for producing EDM tracks.
You can obtain your copy of the Sylenth1 through Lennar Digital’s website.
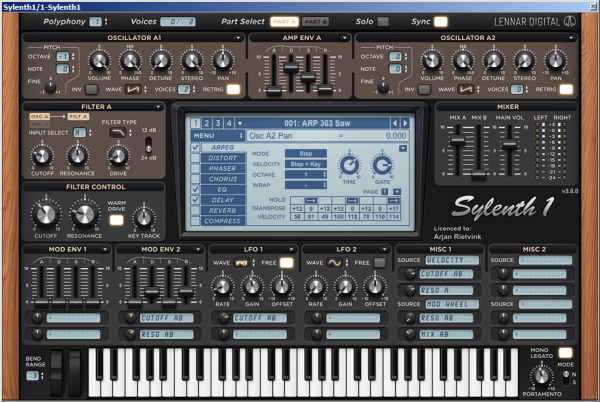
The Sylenth1 is a polyphonic synthesizer. This means that it can play more that 1 note at the same time. The Sylenth1 can play 16 notes at the same time. The most recent release of the Sylenth is version 2.21. But now there is also a beta of version 3 available. Unlike version 2.21 version 3 also works on the 64 bits versions of Mac and Windows. We have tested both versions on the Windows platform. The interface of version 3 looks a bit little better than the interface of version 2.21. There are some improvements of the user interface as well. Now you can switch between skins in real time. Also when using multiple instances of the Sylenth1 in one project each Sylenth can have its own skin. So you can keep them apart more easily. You can re-size the Sylenth1 in real time. Lennar Digital is not mentioning an official release date for version 3 but customers can download the beta from their website. We did not encounter any problems when using the beta. So we think its worth updating to the beta.
Installing the Sylenth1
After you have ordered the Sylenth1 you will receive an e-mail with all the details for downloading and registering the Sylenth1. Depending on which operating system you use you will install the Mac or Windows version.
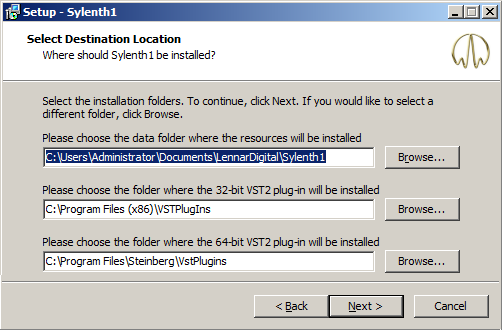
We only tested the Windows versions. But we are sure that most of this article will also apply to Mac users. For those who have never installed a soft synth before we will discuss the installation briefly. As said there is a 32 bit and a 64 bit version. Please note that the 64 bits version will only work on a 64 bits host.
The advantage of a 64 bit system is that such systems have more internal memory available. More memory is important when you use a lot of memory demanding soft synths at once with huge soundbanks.
When installing VST plugins it’s important that you note where the installer is going to put the 32 and 64 bit DLL’s. Your music production software needs to know where the DLL’s are installed. Otherwise the software will not recognize it. These settings can be manipulated in the “options” or “settings” option of your music production software. By installing all the VST plug-ins in the same folder you only have to set this path once for all VST plugins. Please note that you do not install the 32 bit version in the same folder as the 64 bit version! Sylenth1’s installer will install the DLL’s on a location that is defined in the windows registry. Normally on a 64 bit machine this should be “C:\Program Files (x86)\VSTPlugins” for the 32 bit version. And “C:\Program Files\Steinberg\VstPlugins” for the 64 bit version. Sometimes other programs change the registry settings for their benefit so the paths you see when installing the Sylenth1 could differ from what you see here. This is not a problem as long as you remember where the installer puts the DLL’s for reasons explained above.
Soundbanks
The Sylenth1 uses soundbanks as presets for the sounds. The sounds are all generated by 4 oscillators that can each use 8 different wave forms. So no samples are used. Each of the 4 oscillators can use 8 voices (in fact 8 oscillators per stem). So when all the 16 stems are used we are talking about 4*8*16 = 512 oscillators at the same time to generate the sound! Nevertheless the Sylenth does not take up much space on your harddrive. And it also doesn’t use much memory.
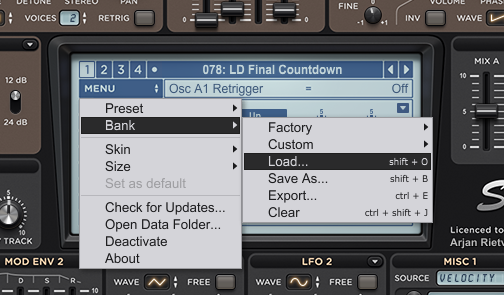
By default there are 4 soundbanks included with this synth. You can open those banks by clicking (on the “LCD display”) at MENU>Bank >Load (.fxb). We have tested this with both version 2.2.1 and the new V3 beta. In the new version opening soundbanks is a little bit different. But you can find it at the same spot and it works more or less the same. (see picture below)
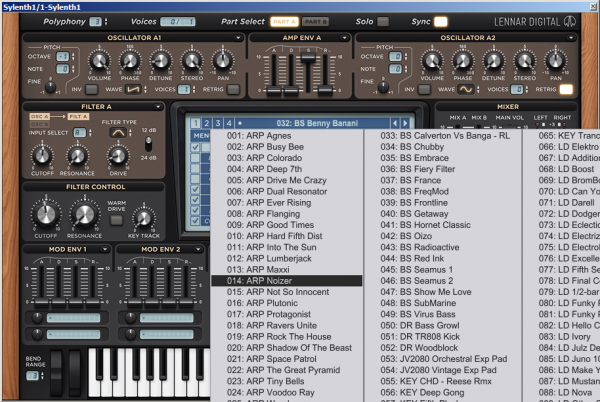
One soundbank can hold up to 512 presets. With the 4 factory soundbanks you almost have 2000 different presets. You can find a lot of useful sounds in those presets to begin with. All these sounds can also be edited too. (more on that later in this article). So the possibilities are endless. It is very convenient that all sounds are listed by type. Like ARP, Bass, Drum, FX, Key, Lead etc. In addition, often the names given to the sounds already give a hint about the sound. You can scroll through the sounds by using the arrows that appear next to the preset name . For example try the Factory Preset Bank 1 032 BS Benny Banani. You immediately think of the dominant lead from the song Satisfaction by Benny Benassi. Or try 078 : LD Final Countdown in the same bank. This sound brings you back to the 80’s when the group Europe had a big international hit with their song “The Final Countdown.”
The diversity of sounds is a source of inspiration for new songs. Because there are so many sounds you can can get lost very easily. So try to search specifically for a certain type of sound that you think you need for your track . Fortunately the clear names that have been given to the presets helps to quickly find the right sound.
3rd Party Soundbanks
Also interesting is the possibility to extend the Sylenth1 with additional soundbanks. These are also made by third parties. Some of them are free. Others costs a few bucks. You can find a lot of soundbanks that are specialized in EDM. It is recommended that you place all the soundbanks you own together in a separate folder on your harddrive. The factory soundbanks can also be accessed with a shortcut.
Famous artists such as Hardwell also created soundbanks for the Sylenth .
During our search for 3rd party sound banks we found: freshly squeezed samples.
After listening online to some demo’s we decided to try Freshly Squeezed Samples – Sylenth1 EDM Essentials vol 1.
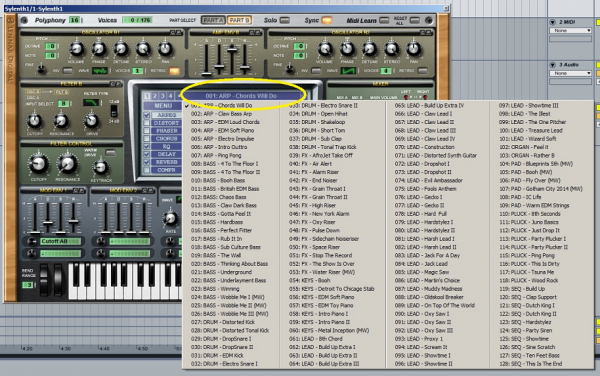
When you have loaded the Sylenth1 EDM Essentials vol 1 soundbank you will notice the first preset “ARP – Chords Will Do” in the LCD display.
When you click on this name a drop down list will appear. So you will see the complete list of presets that are included in this soundbank
Master Effects
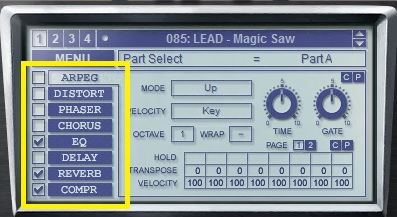
Once you’ve uploaded a patch you like take a look at the LCD display. In the master effects section you will see a few check boxes. You can check and uncheck them to enable or disable the master effects.
Using the master effects you can add reverb ,delay (echo), distortion and some other interesting effects. They will have a great impact on the sound so try to experiment a little with them.
Also useful is the built-in arpeggiator. This is actually a mini sequencer that is been triggered by the keystrokes of your keyboard or MIDI notes from your DAW / Midi Sequencer.
As long as you hold the key the sequence will continue to run. This can be a particular rhythmic pattern which always triggers the same note. But the arpeggiator is also capable of triggering different notes.
Editing of the sounds
You can also edit the sound you have just selected. This is called “synthesis”. After editing the sound you can store it as a preset. You can also start from scratch instead. To start from scratch you chose Menu-> Preset-> Clear. The Sylenth1 has a lot of options to edit the sound. Below we are going to look in to a part of these possibilities step by step.
We start with the oscillators . The Sylenth1 has 4 oscillators.
These are divided into Part A and Part B

In this section you see oscillator A1 and oscillator A2.
An important parameter is the wave. When you click on the waveform with your mouse , you can change the waveform via a drop down list. You can chose between 8 waveforms. In the picture above oscillator A1 is a “Pulse” and oscillator A2 a “Sine” .
To hear the difference between the various wave forms you can simply adjust them while playing on your midi keyboard. For example a saw will sound much meaner that a sinus.
To make sure you are only listening to one oscillator you can lower the fader of mix B so you can focus on the oscillator your are currently working on. Or you can use the solo button. Also turn down the volume of oscillator A2 so you are only listening to oscillator A1.
Every oscilator can play a maximum of 8 voices at the same time. The more voices you use, the more waveforms are being played at the same time. You can find the voices right next to the just discussed wave option. To change the value of the number of voices click (hold left mouse button) on the box where the value of the voices is displayed. Move the mouse up or down to change the number.
You can change the 5 sliver knobs from the oscillator to alter the sound. With the volume button you determine the volume of the wave. The “detune” button is used to detune the wave forms in relation to each other. The more voices you use the bigger it will sound. Especially when you also turn the “stereo” button to the right. Then the voices will be spread across the left and right channel. This will increase the spatial effect. To make the sound even bigger you can use oscillator A2 as well. Did we mention Part 2 has also 2 oscillators? Hope you can imagine now how big the Sylenth1 can sound.
By changing the “pitch” of each oscillator you can create an even bigger sound. You can find it in the left corner of each oscillator. You can do this in big or small steps.
“Octave” means 12 notes up or down. And with the note box you can go one or more notes up or down. And there is a small “fine” knob for the values in between the notes. To make a sound bigger you could copy the settings from oscillator A1 to oscillator A2. Then adjust the octave setting of oscillator A2 to let it go 1 or 2 octaves up or down. You can do this also with the oscillators of part B for an even bigger effect.

To copy settings from one oscillator to another there is a small c and p displayed in the upper right corner of each oscillator. This is used for copy and pasting the settings of the oscillators. This applies to version 2.21. In version 3 they changed this to 2 small arrows that activate a drop down list that holds the options copy, paste and Int. The same goes for the filters, LFO’s and envelopes.
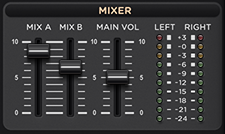
When you have copied and pasted the settings of one oscillator to another it’s a good idea to change the settings a bit again to make it sound bigger. You can do the same in part B and then use the mixer to mix the levels of Part A and B.
Filters
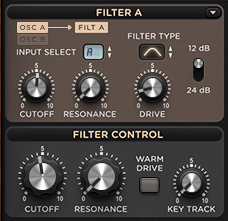
The sound that we have just created with the oscillators can now be edited even further by using the filter. It controls the coloration of a sound. You can boost or cut certain frequencies of the sound. It looks a lot like an EQ but with other options.
The “cutoff” is used for making the sound darker. The resonance makes the sound “rawer”. It lets the filter resonate on the cut off frequency.
The “Filtertype” lets you change the type of filter being used. And the drive makes the sound fatter and warmer.
Again we have a filter for part A and a filter for part B. A nice feature is that you can rout parts A and part B through the same filter. Below the filters of part A and part B there are knobs that control the filters of part A and B at the same time.
Envelopes
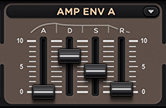
In between oscillator A en B you find the AMP envelope. With this envelope you control the Attack, Decay, Sustain and Release of the amplitude of the sound. The Attack determines for example weather you hear the sound immediately. Or if the sound is faded in. And the release determines how long you can still hear the sound when you have released the note. The decay and sustain values determine what happens in between the attack and release times.
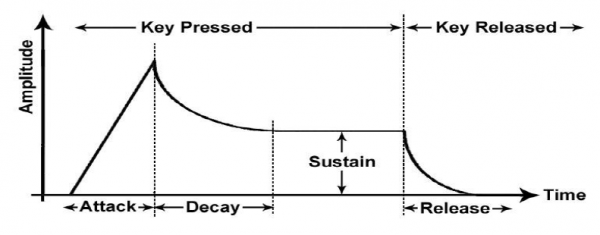
It is recommended to experiment with those settings. So you can hear how it alters the sound. When you like the result you can store the preset you have just created. This is done via “preset” and “save as”.
Modulation Panel

Finally we have the modulation panel at the bottom of the Sylenth1.
Two Modulation envelopes and 2 LFO’s can be assigned to two different parameters of the sylenth1. For example: you could use LFO 1 to control the cut off value of the filter. Then the filter will open and close automatically modulated bij the frequency of the LFO.
Conclusion
The Sylenth1 is a versatile CPU friendly software synthesizer. The sounds are thick and warm. The easy to use interface looks nice . Especially since version 3. There are many possibilities for editing the sounds and creating your own sounds. Also many expansion opportunities by purchasing additional sound banks. In addition, the Sylenth1 is very affordable.
Marco van der Hoorn
Arjan Rietvink

Stefano Montanaro aka Preacker is a young producer, 50% of team [...]
We all know that a nice CD, LP or even a reel to reel tape benefits from [...]

Every now and then we are [...]


